設計和實現請假系統的步驟
主要流程
flowchart LR
    A["員工登入綁定"]
    B["員工申請休假"]
    C["主管批准休假"]
    D["通知團隊"]
    A --> B --> C --> D
次要流程
- 查詢紀錄
- 取消請假
(本章節將不會探討次要流程的設計)
使用意圖設計申請休假
先創建辭典
leave_type
- 特休;特休假
- 病假
- 事假
- 其他
另外仍有防疫照顧假、喪假、防疫隔離假、謀職假、婚假、產檢假、產假、安胎假、育嬰留職停薪、陪產假、公傷病假、公假、家庭照顧假、生理假等可自行添加。
1.創建詞槽
| 詞槽 | 引用詞典 | 別名 |
|---|---|---|
| leave | leave_type | 請假 |
| reason | @ANY | 請假原因 |
| leave_from | @TIME | 請假開始時間 |
| leave_end | @TIME | 請假結束時間 |
2.將說法填入
我想請{leave}從{leave_from}到{leave_end}
我想從{leave_from}開始請假
我想請假從{leave_from}到{leave_end}
我想請假
我想請{leave}
3.如果要加上確認
確認要再添加yes以及no的意圖,建立完成後,接續問法如下
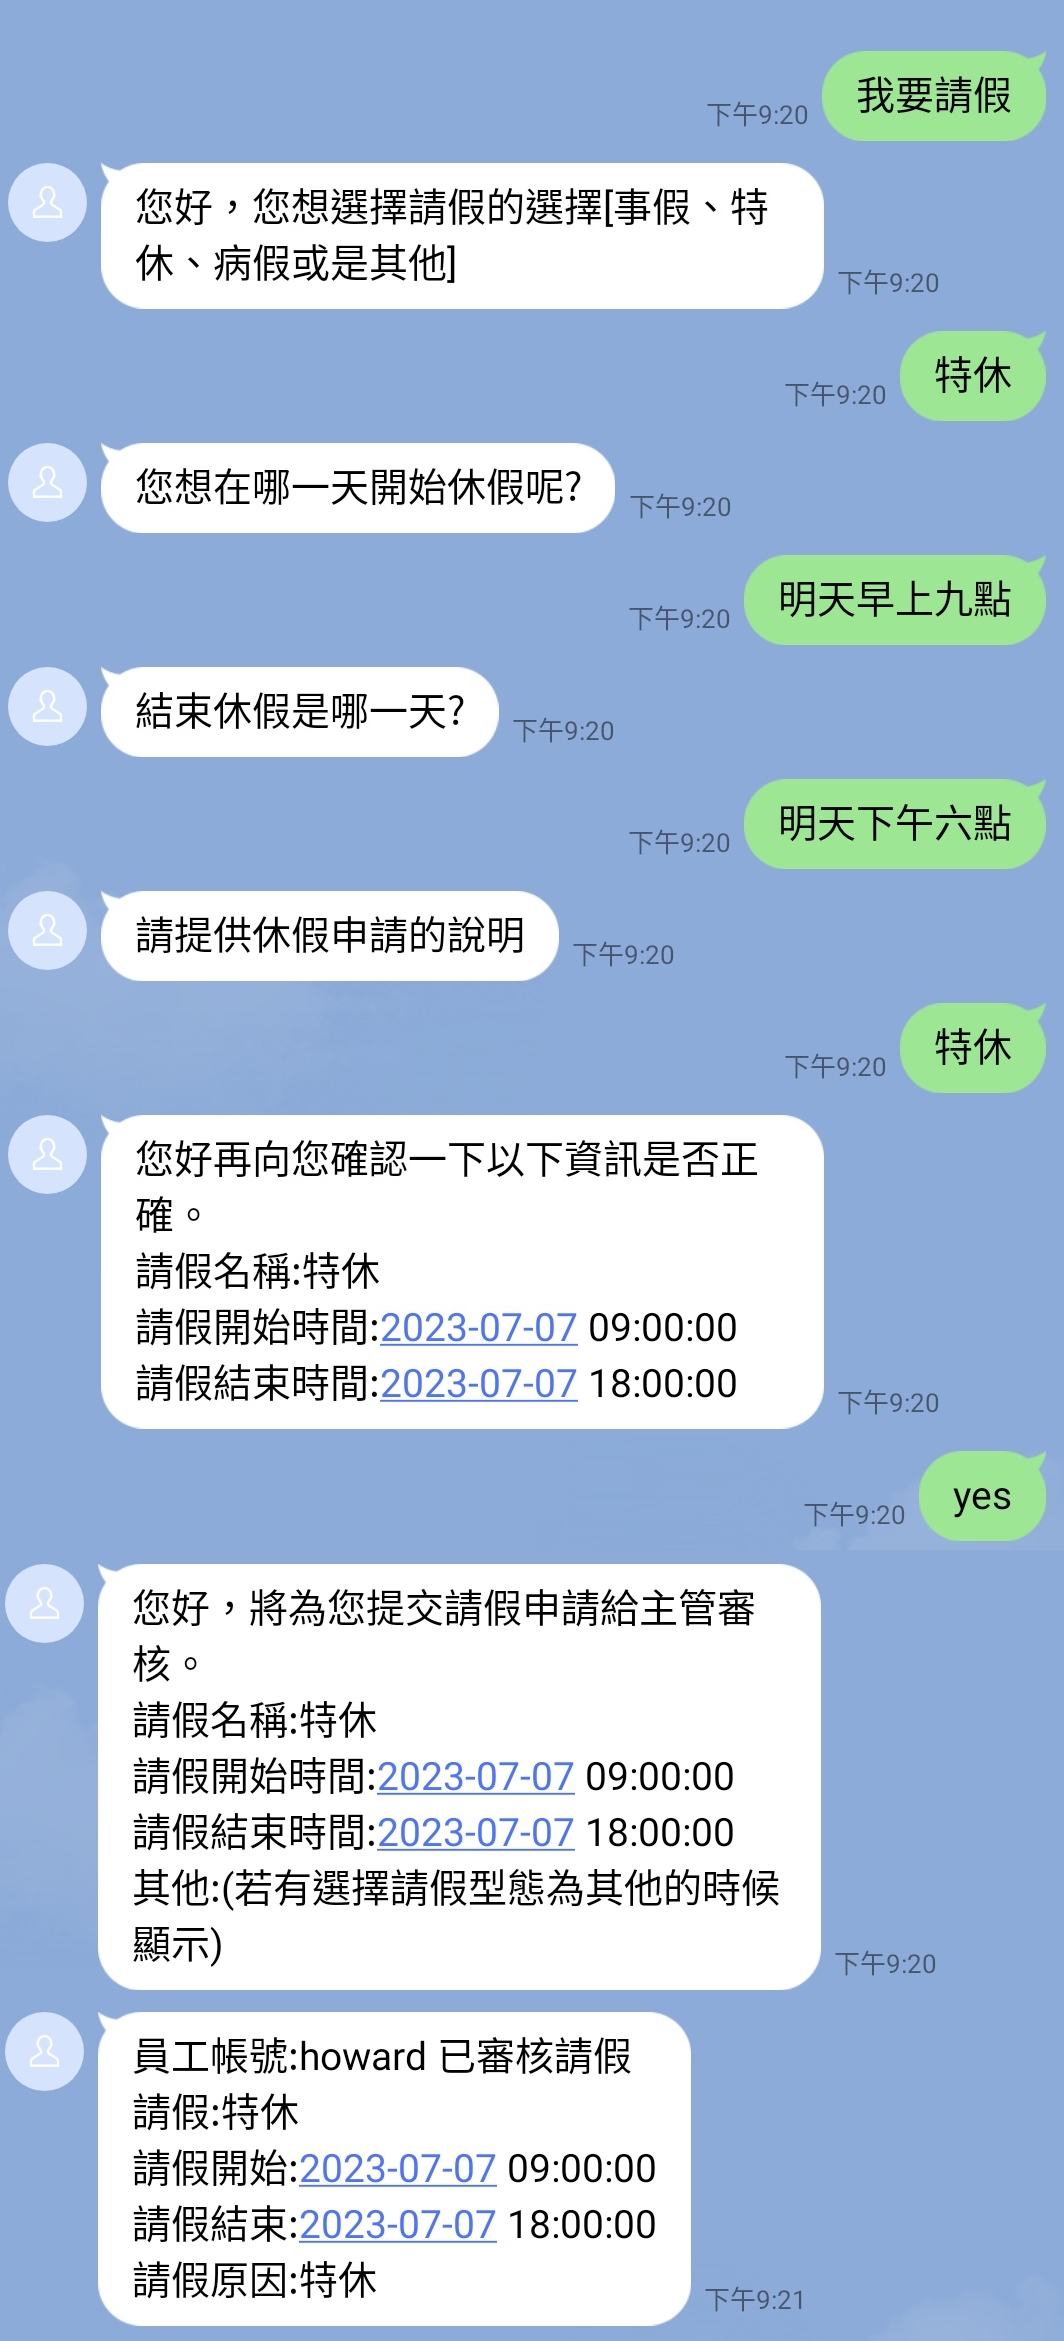
您好再向您確認一下以下資訊是否正確。
請假名稱:${#entities.leave.value}
請假開始時間:${%extractTime(#entities.leave_from.norm,'yyyy-MM-dd HH:mm:ss','')}
請假結束時間:${%extractTime(#entities.leave_end.norm,'yyyy-MM-dd HH:mm:ss','')}
如果命中yes意圖則會導向完成。 如果命中no意圖則會直接結束對話。 如果命中其他意圖會進行其他意圖對話。
4.完成
提交主管審核,得透過resource使用API對外交互。
您好,將為您提交請假申請給主管審核。
請假名稱:${#entities.leave.value}
請假開始時間:${%extractTime(#entities.leave_from.norm,'yyyy-MM-dd HH:mm:ss','')}
請假結束時間:${%extractTime(#entities.leave_end.norm,'yyyy-MM-dd HH:mm:ss','')}
如何向對外交互
此範例將由Google Apps Script作為範例。
我們可以先透過Login的方式,定義是用者的權限。 我們可以透過下一章的LINE平台-帳號連結
我們在帳號連結得到的資料是
| username | password | nonce | user_id |
|---|
新增一個欄位叫manager這邊放上主管的user_id
| username | password | nonce | user_id | manager |
|---|
直接自己把自己連接的userId填寫到manager即可,在此略過建立主管、主管註冊、主管登入等步驟。
也就是說你可以參考以下填寫。
| username | password | nonce | user_id | manager |
|---|---|---|---|---|
| howard | 123456 | xxxx | U1234XXX | U1234XXX |
我們在上面第四點的完成部分"您好,將為您提交請假申請給主管審核。",所以必須將獲得的資料建立在另一個Spreadsheets,於是我們新增第二個工作表。欄位如下。
| id | user_id | leave | leave_from | leave_end | reason | audit |
|---|
其中audit為true or false,為當前假期是否審核過。
於是在程式碼.gs由此寫下
function searchUser(userId) {
  var id = '{{你的Spreadsheet ID}}';
  var spreadsheet = SpreadsheetApp.openById(id);
  var sheet = spreadsheet.getSheets()[0];
  var data = sheet.getDataRange().getValues();

  for (var i = 1; i < data.length; i++) {
    var storeUserId = data[i][3];
    if (storeUserId === userId) {
      return { success: true, user: data[i] };
    }
  }
  return { sucess: false };
}

function formatTimestamp(timestamp) {
  var date = new Date(timestamp * 1000);
  var year = date.getFullYear();
  var month = ('0' + (date.getMonth() + 1)).slice(-2);
  var day = ('0' + date.getDate()).slice(-2);
  var hours = ('0' + date.getHours()).slice(-2);
  var minutes = ('0' + date.getMinutes()).slice(-2);
  var seconds = ('0' + date.getSeconds()).slice(-2);

  var formattedDate = year + '-' + month + '-' + day + ' ' + hours + ':' + minutes + ':' + seconds;
  return formattedDate;
}

function sendMessageToManager(userId, user, lineToken, leave, leave_from, leave_end, reason, leave_id) {
  const username = user[0];
  const managerId = user[4];
  const endpoint = 'https://api.line.me/v2/bot/message/push';
  var message = {
    to: managerId, messages: [
      {
        type: 'template',
        altText: '員工請假通知',
        template: {
          type: 'buttons',
          text: `員工帳號:${username}
請假:${leave}
請假開始:${formatTimestamp(leave_from)}
請假結束:${formatTimestamp(leave_end)}
請假原因:${reason}`,
          actions: [
            { type: 'postback', label: '核准請假', data: `/allowed_leave "${leave_id}" ` }
          ]
        }
      }
    ]
  };
  var options = {
    method: 'post',
    headers: {
      'Content-Type': 'application/json',
      'Authorization': lineToken
    },
    payload: JSON.stringify(message)
  };
  var response = UrlFetchApp.fetch(endpoint, options);
  Logger.log('LINE push message sent. Response code: ' + response.getResponseCode());
}

function createLeave(userId, leave, leave_from, leave_end, reason, audit) {
  var id = '{{你的Spreadsheet ID}}';
  var spreadsheet = SpreadsheetApp.openById(id);
  var sheet = spreadsheet.getSheets()[1];
  var uniqueID = Utilities.getUuid();
  var rowData = [uniqueID, userId, leave, leave_from, leave_end, reason, audit];
  sheet.appendRow(rowData);
  return { success: true, id: uniqueID };
}

function updateLeaveAudit(leaveId, notify, lineToken) {
  if (leaveId) {
    var id = '{{你的Spreadsheet ID}}';
    var spreadsheet = SpreadsheetApp.openById(id);
    var sheet = spreadsheet.getSheets()[1];
    var data = sheet.getDataRange().getValues();
    for (var i = 1; i < data.length; i++) {
      var storeId = data[i][0];
      if (storeId === leaveId) {
        let audit = data[i][6];
        if (audit === false) {
          var cell = sheet.getRange("G" + (i + 1));
          cell.setValue(true);
          var userId = data[i][1];
          if (notify && lineToken) {
            const leave = data[i][2];
            const leave_from = data[i][3];
            const leave_end = data[i][4];
            const reason = data[i][5];
            const r = searchUser(userId);
            const endpoint = 'https://api.line.me/v2/bot/message/push';
            var message = {
              to: userId, messages: [
                {
                  type: 'text',
                  text: `員工帳號:${r.user[0]} 已審核請假
請假:${leave}
請假開始:${formatTimestamp(leave_from)}
請假結束:${formatTimestamp(leave_end)}
請假原因:${reason}`
                }
              ]
            };
            var options = {
              method: 'post',
              headers: {
                'Content-Type': 'application/json',
                'Authorization': lineToken
              },
              payload: JSON.stringify(message)
            }; var response = UrlFetchApp.fetch(endpoint, options);
            Logger.log('LINE push message sent. Response code: ' + response.getResponseCode());
          }
        } else {
          return { success: false }
        }
        break;
      }
    }
  }
  return { success: true }
}
function doPost(e) {
  var param = JSON.parse(e.postData.contents);
  let action = param.action;
  var result = {};
  if (action === 'createLeave') {
    let userId = param.userId;
    let leave = param.leave;
    let leave_from = param.leave_from;
    let leave_end = param.leave_end;
    let reason = param.reason;
    let notify = param.notify;
    let lineToken = param.lineToken;
    let audit = false;
    result = createLeave(userId, leave, leave_from, leave_end, reason, audit);
    if (userId && notify && lineToken) {
      const r = searchUser(userId);
      if (r.user[4] && notify && lineToken) {
        sendMessageToManager(userId, r.user, lineToken, leave, leave_from, leave_end, reason, result.id);
      }
    }
  }else if (action === 'updateLeave') {
    let id = param.id;
    let notify = param.notify;
    let lineToken = param.lineToken;
    result = updateLeaveAudit(id, notify, lineToken);
  }
  Logger.log(result);
  return ContentService.createTextOutput(JSON.stringify(result))
    .setMimeType(ContentService.MimeType.JSON);
}
分別新增二個action分別是createLeave、updateLeave
- createLeave:新增請假原因,其中notify跟lineToken是因為在測試領域的時候,不應該通知主管,需整合機器人流程才可執行。lineToken包含"Bearer "
- updateLeave:將指定id的leave中的audit轉為true
新增好兩個action後,繼續完成領域資源。
領域資源設定
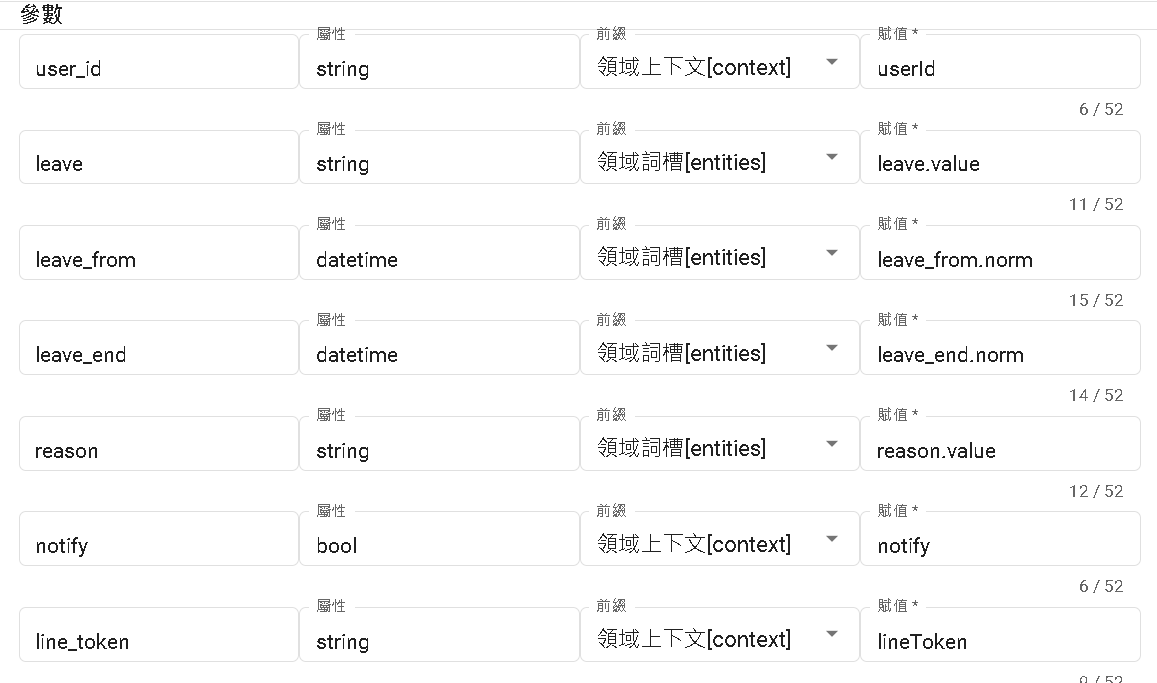
建立變數分別是
| 名稱 | 屬性 |
|---|---|
| success | bool |
| notify | bool |
| reason | string |
| leave_end | datetime |
| leave_from | datetime |
| leave | string |
| user_id | string |
| line_token | string |
建立資源
資源名稱: saveLeave
URL:script.google.com/macros/s/{{生產部屬的ID}}/exec
Method: POST
Content-Type: JSON
參數
| 鍵 | path |
|---|---|
| user_id | userId |
| leave | |
| leave_from | |
| leave_end | |
| reason | |
| notify | |
| line_token | lineToken |
{
    "action": "createLeave",
    "userId": "",
    "leave": "",
    "leave_from": "",
    "leave_end": "",
    "reason": "",
    "notify": "notify",
    "lineToken": ""
}
notify是指要不要通知主管。
回傳值
| JSON Path | 鍵 |
|---|---|
| success | success |

回到DMflow做流程
1.可以先在config.lineToken 新增line token,以Bearer xxxx(此範例未將Bearer拆開)
2.新增變數
| 名稱 | 屬性 |
|---|---|
| success | bool |
| notify | bool |
| user_id | string |
| leave_id | string |
3.建立資源
資源名稱: updateLeave
URL:script.google.com/macros/s/{{生產部屬的ID}}/exec
Method: POST
Content-Type: JSON
參數
| 鍵 | path |
|---|---|
| leave_id | id |
| notify | |
| line_token | lineToken |
{
    "action": "updateLeave",
    "notify": false,
    "lineToken": "",
    "id": ""
}
notify是指要不要通知使用者審核已經過了。
回傳值
| JSON Path | 鍵 |
|---|---|
| success | success |
4.領域設定
開啟請假領域並添加傳遞變數分別為
| 鍵 | 前綴 | 值 |
|---|---|---|
| notify | constant | true |
| lineToken | config | lineToken |
| userId | sys_user | userId |
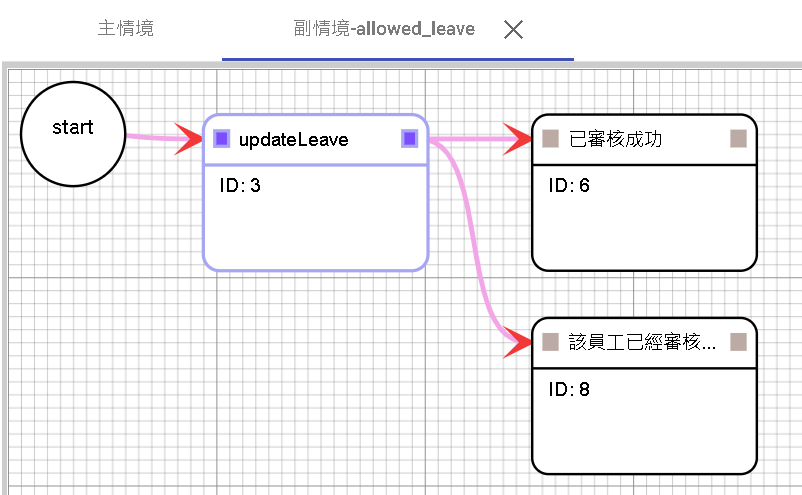
5.新增allowed_leave 場景

ID 3 資源節點
選取updateLeave
參數:
  notify->constant true
  leave_id->conversation._params.0
  line_token->config.lineToken
回傳值:
  success->success
Start->ID 3 條件節點
條件為
  conversation._params.0 已填充
  sys_user.platform = constant @line
ID 6 回覆節點
文本:已審核成功
取消等待用戶回覆
ID 8 回覆節點
文本:該員工已經審核過了
取消等待用戶回覆
ID 3->ID 6 條件節點
條件為
  conversation.success = constant true
ID 3->ID 8 條件節點
條件為
  conversation.success = constant false
並在主節點,隨便放下調用節點,並選取請假領域即可。
6.更新並發布
實際畫面:
使用者要求請假

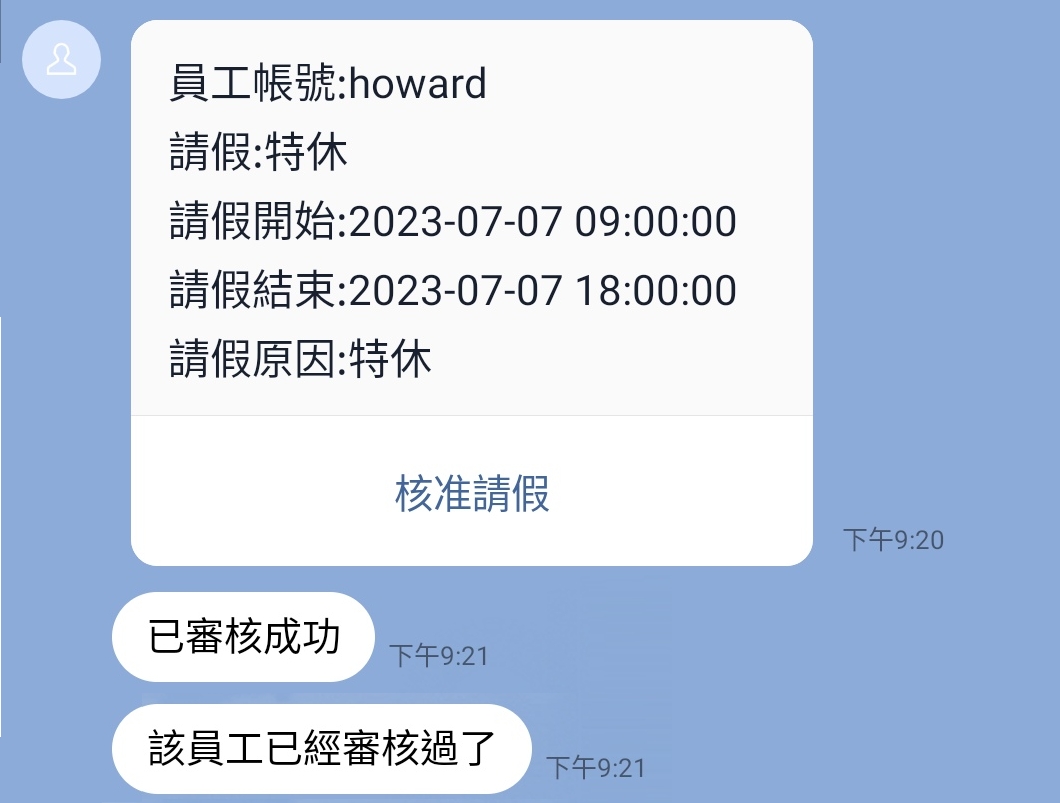
審核者畫面

最後若是此範例完畢,記得管理部屬作業將該程序封存,讓程序下線,避免已經綁定信用卡的使用者造成不必要的費用問題。
聯絡資訊
DMflow.chat 官網: DMflow.chat (於2024-05-18更改網域至DMflow.chat,此文檔將不再維護請至DMflow.chat文檔查看新版文檔)